操作系统实验报告1
实验材料
一、实验目的
本次实验是在ubantu系统的虚拟机中使用xv6提供的部分函数,完成对应的问题。
二、实验内容
task1
为xv6实现UNIX程序sleep,并且sleep应该暂停用户指定的滴答数。
这一个任务较为简单,是为了帮助我们熟悉xv6中的系统调用而设计的。我们直接上源代码:
#include "kernel/types.h"
#include "kernel/stat.h"
#include "user/user.h"
int main(int argc,char *argv[])
{
if(argc<2){
fprintf(2, "Usage: sleep number\n");
exit(1);
}
int number = atoi(argv[1]);
sleep(number);
exit(0);
}
完成一个sleep程序,首先我们需要知道怎么获得传递给程序的命令行参数。 参考user/echo.c,我们发现它通过一个循环来逐个读取命令行参数,并且在主函数中直接调用了argv:
for(i = 1; i < argc; i++){
    write(1, argv[i], strlen(argv[i]));
    ...}
再查阅相关资料,可知argc就是argument count,argv就是argument vector,其中argv[0]是指这个程序的名称/路径。
由此可知,为了提高程序的健壮性,我们需要在输入参数不足时,提示用户输入足量的参数。由实验手册可知,sleep命令的输入格式为sleep 10,因此argv参数至少有2个。(注意,输入的sleep本身就是文件名)
第二点,命令行输入的格式默认为字符串,因此我们还需要atoi函数,将输入的数字字符串转换为整型变量。
最后一点,程序必须要使用exit(0)确保main能正常退出,非正常退出时使用exit(1)。
补充说明:fprintf只比printf多一个FILE*指针,指定将程序输入到某个位置。这个位置被文件描述符确定,常用的文件描述符包括:

显然,这里是指错误输出(fd = 2)。
task2
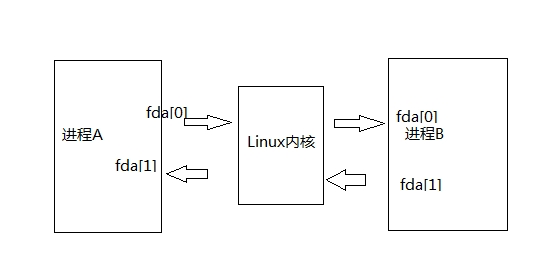
pingpong的任务是使用UNIX系统调用通过一对pipe在两个进程之间“pingpong”一个字节。父进程应向子进程发送一个字节;子进程应打印“pid: received ping”,其中pid是其进程 ID,将管道上的字节写入到父进程,然后退出;父进程应该从子进程读取字节,打印“pid: received pong”,然后退出。
完成这个任务首先我们需要知道pipe的基本作用和用法。查阅相关资料可知,pipe是一种把两个进程之间的标准输入和标准输出连接起来的机制,从而提供一种让多个进程之间相互通信的方法。下面观察pipe函数的构成:
#include <unistd.h>
int pipe(int filedes[2]);
// filedes:用于存储读/写两个文件描述符
这意味着要想使用pipe函数,必须有提供两个长度为2的数组,并且filedes[0]用于读,filedes[1]用于写(这也侧面说明pipe是单向传输的)。其返回值为0时,就说明设置管道成功。默认情况下,管道两端(即文件描述符[0]和[1])是阻塞的,我们不能read一个空管道,也不能往一个写满内容的管道write。
补充:read函数阻塞有且仅有管道为空且有程序在管道另一头等待执行时才阻塞,否则如果管道另一头没有程序等待执行,则read函数会读取EOF符。
其次,我们还需要知道fork()函数的使用方式。fork函数能够创建一个几乎与正在执行的进程(后称父进程)相同的子进程,但是仍有细微差别(如pid等属性不同,fork返回值不同)。利用fork函数调用一次会返回两次,分别在父子进程返回一个值,父进程范围子进程的pid,而子进程返回0。利用这一特性,我们可以分开讨论父子进程。 需要注意的是,父子进程的执行顺序不是固定的,我们还需要借助wait()函数(通常在父进程中调用,保证子进程执行完成后父进程再结束)来控制父子进程的顺序。
理解上述背景知识后,就可以直接开始上手源代码了:
#include "kernel/types.h"
#include "kernel/stat.h"
#include "user/user.h"

int main(int argc, char* argv[]){
    int parent_pip[2];
    int child_pip[2];
    int parent_fd = pipe(parent_pip); // create a one-way communication channel,[0]->read,[1]->written
    int child_fd = pipe(child_pip); // fd is ABBR of 'file discriptor'


    if(parent_fd== -1){
        printf("pipe1 error");
    }
    if(child_fd== -1){
        printf("pipe2 error");
    }

    int pid = fork(); // create a child process,whose return value is 0
    char buf[32];
    if (pid == 0) { // child
        close(child_pip[0]);
        close(parent_pip[1]);
        read(parent_pip[0], buf, 4);

        printf("%d: received ping\n", pid);

        write(child_pip[1], "pong", strlen("pong"));
        exit(0);
    }
    else{ // parent
        close(child_pip[1]);
        close(parent_pip[0]);
        write(parent_pip[1], "ping", strlen("ping"));
        wait(0); // ensure the output sequence is ordered!!!

        read(child_pip[0], buf, 4);

        printf("%d: received pong\n", pid);
        exit(0);
    }

}
解析上述源代码。
首先我们创建两个存储读写文件描述符的数组,并在管道名上做出区别(以起点为名)。在创建完成pipe后,确认其返回值是否正常,否则就输出创建失败。
下一步开始正式在两个进程之间传递数据。首先,使用fork函数创建子进程。接下来,通过if判定fork返回值来对子进程和父进程分类讨论。 根据实验手册,我们的设想是,父进程写一个字节给子进程,然后子进程打印相关内容,并向父进程写一个字节,最后父进程打印相关内容。因此对于父进程而言,我们需要先关闭无关的管道口,然后向子进程写一个字节。这里有一个很重要的函数wait(也是因为这一点成绩评估一直未通过),这个函数确保我们能在子进程结束后再执行父进程的read,否则我们将有可能直接读一个空管道,引发pipe堵塞的错误。对于子进程而言,就只需要读到父进程传过来的字节,然后打印相关内容,最后给父进程写内容即可。两边都需要一个exit(0)确保程序正确退出。
补充说明一下read和write:
ssize_t read(int fd, void *buf, size_t count);
ssize_t write(int fd, const void *buf, size_t count);
其中fd为相应的文件描述符,buf为用户指定的缓冲区,以及最大读取/输出字节数。例如,在pingpong.c里,我们先指定了数据缓冲区buf[32],然后调用了write,把ping给写入管道中(此时ping存储在内核缓存中),接下来我们调用read,把写入管道的ping给读入buf中,从而完成了一次完整的管道传输。
task3
这个任务要求我们使用pipe编写素数筛,这种素数筛法的完整名称是埃拉托斯特尼素数筛,其大致思想就是在确定某一个素数后,使用这个素数将指定范围内的所有质因分解后含有该素数的合数全部排除,最终达到快速筛选素数的目的。
其大致思路如下图:
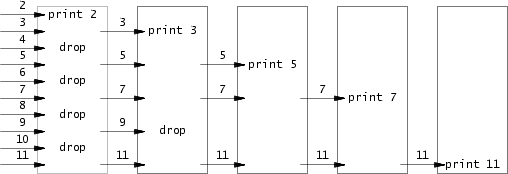
与一般的筛法不同,我们需要借助管道实现筛法的功能——将经过筛选后的数字输入下一个管道,依次循环,直到没有合数。对于筛法而言,一个关键性质在于我们每次筛选完之后输入下一个管道的数组里,第一个数字一定是素数。那么我们就可以在每次都取出第一个数字作为筛选的关键词,逐个排除合数。了解算法的核心思想后,我们就可以开始着手编写程序了。
#include "kernel/types.h"
#include "kernel/stat.h"
#include "user/user.h"

void print_prime(int *input, int count){ // input is an array of primes, and count is the account of primes
    if (count == 0){ // no more primes
        return;
    }
    int p[2]; // a pipe to passing selected nums
    pipe(p);
    int i = 0;
    int prime = *input; // this is equals to input[0],which is certified a prime! (important)
    char buf[4];
    printf("prime %d\n", prime);
    if (fork() == 0){ // child process, pass rest of the nums into the parent process
        close(p[0]);
        for (; i < count; i++){
            write(p[1], (char*) (input + i), 4);
        }
    close(p[1]);
    exit(0);
    }
    else{
        close(p[1]);
        count = 0; // initialize the account of primes
        while(read(p[0], buf, 4) != 0){ // read the context of child
            int temp = *((int *) buf); // the number waiting to be selected
            if (temp % prime) { // the number is not mutiple of the current prime(remainder is not  0)
                *input++ = temp; // make the number a member of next list to be selected
                count++;
            }
        }
        print_prime(input - count, count); // input - count is to go back to input[0]
        close(p[0]);
    }
}

int main(int argc, char* argv[]){
    int input[34], i = 0;
    for(; i < 34; i++){
        input[i] = i + 2; // nums from 2 to 35
    }
    print_prime(input, 34);
    exit(0);
}
先看主函数。
首先实验要求筛选1-35之中的所有素数,那么1本身不是素数也不是合数,直接排除;剩下34个数字中,最开始的数字2就是素数,满足循环不变式的条件,因此可以直接输入函数print_prime中,作进一步讨论。
再看关键函数print_prime。
首先形式参数我们选择一个数组和描述数组大小的整型变量count。在函数内,先要制作一个在父子进程中传递数据的管道p,为了进行读写,还需要指定一个缓冲区buf。最后是找到作为筛选关键词的prime并打印出来。
接着,我们使用fork函数创建子进程。由于我们需要先在子进程中write所有input中的数到管道中,再在父进程中read这些数,最后再进一步筛选。这个先后顺序已经暗含在其中,因此没有使用wait。 回到具体源代码。子进程中,使用传入参数count控制传递进管道的数字数量;父进程中,将count清零,然后按照整型的字节大小依次读出传出的数,再根据prime筛选符合条件的素数。完成这一切后,将新的数组作为input,递归调用print_prime。 注意到在父进程中,input不断自增,这要求我们在最后传入数组时减去修改的这些数,将input[0]回调到第一个素数的位置。
在整个递归调用的过程中,循环不变式的性质是一直满足的;素数是在一次次递归调用中一个一个被打印出来的,也算是完成了题目要求。
task4
这个任务要求我们编写一个简单版本的UNIX查找程序,以查找目录树中具有特定名称的所有文件。 在实验手册中,有提示我们去阅读ls.c以理解目录的工作方式,因此我们先去ls.c观察一下。
ls源代码较长,我们分块解读。
#include "kernel/types.h"
#include "kernel/stat.h"
#include "user/user.h"
#include "kernel/fs.h"

char*
fmtname(char *path)
{
  static char buf[DIRSIZ+1];
  char *p;

  // Find first character after last slash.
  for(p=path+strlen(path); p >= path && *p != '/'; p--)
    ;
  p++;

  // Return blank-padded name.
  if(strlen(p) >= DIRSIZ)
    return p;
  memmove(buf, p, strlen(p));
  memset(buf+strlen(p), ' ', DIRSIZ-strlen(p));
  return buf;
}
首先是一个fmtname函数,根据实验说测可知,这个函数的功能是为了格式化文件夹或目录名称以进行现实的函数。通俗来讲,就是把名字变为没有左斜杠的字符串,然后返回。
细看一下,能够学到一些新颖的用法。首先它并没有使用memcpy把p的值赋给buf,而是使用了memmove。关于这一点,网上资料给出的解释是mommove是"copy from the tail",相比于memcpy更安全(同时,由于上文也是通过倒序的for循环找到第一个左斜杠,因此这里的copy方式也是相互呼应的)。 其次是一个需要解释的DIRSIZ,它的大小是14,在types.h中有解释。
void
ls(char *path)
{
  char buf[512], *p;
  int fd;
  struct dirent de;
  struct stat st;

  if((fd = open(path, 0)) < 0){
    fprintf(2, "ls: cannot open %s\n", path);
    return;
  }

  if(fstat(fd, &st) < 0){
    fprintf(2, "ls: cannot stat %s\n", path);
    close(fd);
    return;
  }

  switch(st.type){
  case T_FILE:
    printf("%s %d %d %l\n", fmtname(path), st.type, st.ino, st.size);
    break;

  case T_DIR:
    if(strlen(path) + 1 + DIRSIZ + 1 > sizeof buf){
      printf("ls: path too long\n");
      break;
    }
    strcpy(buf, path);
    p = buf+strlen(buf);
    *p++ = '/';
    while(read(fd, &de, sizeof(de)) == sizeof(de)){
      if(de.inum == 0)
        continue;
      memmove(p, de.name, DIRSIZ);
      p[DIRSIZ] = 0;
      if(stat(buf, &st) < 0){
        printf("ls: cannot stat %s\n", buf);
        continue;
      }
      printf("%s %d %d %d\n", fmtname(buf), st.type, st.ino, st.size);
    }
    break;
  }
  close(fd);
}

int
main(int argc, char *argv[])
{
  int i;

  if(argc < 2){
    ls(".");
    exit(0);
  }
  for(i=1; i<argc; i++)
    ls(argv[i]);
  exit(0);
}
接下来就是读目录的关键函数。首先它定义了两个结构体变量。这里我也是先去查找了相关的定义:
// copy from stat.h
struct stat {
  int dev;     // File system's disk device
  uint ino;    // Inode number
  short type;  // Type of file
  short nlink; // Number of links to file
  uint64 size; // Size of file in bytes
};
// copy from fs.h
struct dirent {
  ushort inum;
  char name[DIRSIZ];
};
struct dinode { // On-disk inode structure
  short type;           // File type
  short major;          // Major device number (T_DEVICE only)
  short minor;          // Minor device number (T_DEVICE only)
  short nlink;          // Number of links to inode in file system
  uint size;            // Size of file (bytes)
  uint addrs[NDIRECT+1];   // Data block addresses
};
可以看到,stat和dirent都是是用于解析文件的属性。
接下来,使用两个if确保打开文件和解析文件正确执行。
之后进入了关键部分:对文件属性分类讨论,确定进一步操作。如果是T_FILE类型,就直接打印他的路径;如果是T_DIR,则通过while不断地读下一段文件名。(这个终止条件没有太理解,但是貌似可以直接用在find.c中)
初步理解ls文件后,就可以根据ls.c编写我们需要的find程序了。事实上,这个程序的框架完全是ls的,只需要进行微调即可。以下是源代码:
#include "kernel/types.h"
#include "kernel/stat.h"
#include "user/user.h"
#include "kernel/fs.h"

/*
// copy from stat.h
struct stat {
  int dev;     // File system's disk device
  uint ino;    // Inode number
  short type;  // Type of file
  short nlink; // Number of links to file
  uint64 size; // Size of file in bytes
};
// copy from fs.h
struct dirent {
  ushort inum;
  char name[DIRSIZ];
};
struct dinode { // On-disk inode structure
  short type;           // File type
  short major;          // Major device number (T_DEVICE only)
  short minor;          // Minor device number (T_DEVICE only)
  short nlink;          // Number of links to inode in file system
  uint size;            // Size of file (bytes)
  uint addrs[NDIRECT+1];   // Data block addresses
};
*/

char* fmtname(char *path) {
  static char buf[DIRSIZ + 1]; // the size is 15
  char *p;
  // Find first character after last slash.
  for (p = path + strlen(path); p >= path && *p != '/';p--);
  p++;
  // Return blank-padded name.
  if (strlen(p) >= DIRSIZ) return p;
  memmove(buf, p, strlen(p));// copy from the tail, similar to memcpy
  memset(buf+strlen(p), ' ', DIRSIZ-strlen(p));// fill the rest of buf with blank
  buf[strlen(p)] = 0;
  return buf;
}

void find(char *path, char *fileName) {
  char buf[512], *p;// buf and p is to store new path iteratively
  int fd;// file discriptor
  struct stat st;
  struct dirent de;// describe the property of files
  // these two ifs copy from ls.h
  if ((fd = open(path, 0)) < 0 ) {
    fprintf(2, "find: cannot open %s\n", path);
    return;
  }
  if (fstat(fd, &st) < 0) {
    fprintf(2, "find: cannot stat %s\n", path);
    close(fd);
    return;
  }
  //printf("%s %s\n",path, fmtname(path));
  switch(st.type) {
  case T_FILE: // when the file is actually a file
    //printf("%s\n", fmtname(path));
    if (strcmp(fmtname(path), fileName) == 0) {
      printf("%s\n", path);
    }
    break;
  case T_DIR:
  // copy from ls.h
    //printf("%s %s\n", path, fmtname(path));
    if(strlen(path) + 1 + DIRSIZ + 1 > sizeof buf) {
      printf("find: path too long\n");
      break;
    }
    strcpy(buf, path);
    p = buf + strlen(buf);
    *p++ = '/';
    while (read(fd, &de, sizeof(de)) == sizeof(de)) {
      if (de.inum == 0 || strcmp(de.name, ".") == 0 || strcmp(de.name, "..") == 0) {
        continue;
      } // skip when the name is "." or ".." and inum is 0(known from ls.h)
      memmove(p, de.name, DIRSIZ); // copy the name to p
      p[DIRSIZ] = 0; // let the str end
      find(buf, fileName); // iteratively call the function util the buf is a T_FILE

    }
    break;
  }
  close(fd);
}

int main(int argc, char *argv[]) {
  if (argc < 3) {
    printf("error\n");
    exit(1);
  }
  find(argv[1], argv[2]);
  exit(0);
}
微调的地方如下: 首先,我们找到T_FILE之后,不需要打印那么多冗余信息,只需要确认path和file相同后,打印path即可; 其次,在T_DIR中,我们的终止条件还应当参考实验手册,不需要递归"."和"..",因此在while中也需要把他们排除。 最后,应当注意到while循环体内调用了find(),这是为了在每一级目录中找到我们所需要的文件,如果把find给移除循环,就只能在最后一级目录中找相应的文件,可能会漏查。
适当解读一下主函数。我们在查找一个文件时,输入的命令行参数大致格式是“find path filename”,因此我们只需要调用的时候使用argv[1](path)和argv[2](filename)即可。
task5
最后一个任务是要求编写一个简单版本的UNIX xargs程序,也就是从标准输入读取行并为每行运行一个命令。将该行作为参数提供给命令。
详细地解读xargs,事实上其功能通常为处理通过管道传递的输入。xargs从标准输入或者其他命令的输出中态读取数据,并将其作为参数传递给指定命令。以下为输入的语法:
command | xargs [options] [command]
最后,题干要求的xargs是从标准输入读取行,因此我们只考虑fd = 0的情况即可。下面直接看源代码。
#include "kernel/types.h"
#include "user/user.h"
#include "kernel/param.h"

// #define MAXARG       32  // max exec arguments

int main(int argc, char *argv[]){
    int i, count = 0;
    int k, m = 0;
    char *splitLine[MAXARG], *p; // p is to help with passing the parameters
    char block[32], buf[32]; // block and buf store the read content
    p = buf;
    for (i = 1; i<argc; i++){         // this is to copy the command line parameters to splitLine
        splitLine[count++] = argv[i]; // start from 1 because i = 0 is to store the path of the file
    }
    while( (k = read(0, block, sizeof(block) )) > 0 ){ // to read all the parameters till it ends
        for(i = 0; i<k; i++){ // analyse a parameter letter by letter
            if(block[i] == '\n'){ // when meeting '\n',
                buf[m] = 0;
                splitLine[count++] = p;
                splitLine[count] = 0;
                m = 0;
                p = buf;
                count = argc - 1; // prepare for reading the next new parameter
                if(fork() == 0){
                    exec(argv[1], splitLine); // the path and parameters
                }
                wait(0);
            }
            else if(block[i] == ' '){ // when meeting ' ',new the buf and p
                buf[m++] = 0;
                splitLine[count++] = p;
                p = &buf[m];
            }
            else{ // just commonly store the patameter letter by letter
                buf[m++] = block[i];
            }
        }
    }
    exit(0);
}
首先,我们需要在param.h中找到定义命令行最大参数数量的宏定义MAXARG,用这个来定义所有逐行输入的命令。
接着,我们需要一个for循环先把所有从1开始的argv[]参数保存到splitline中。
之后,我们又需要一个while循环来对每一个命令行参数读取。这里有一个tricky的技巧,即在while的条件判断式直接获得每个参数的长度——利用read函数返回所读参数的长度的性质,既判断有无剩余参数,又能获得参数长度。
在while循环中,嵌套一个for循环,逐字母地读取参数。注意到单行输入的结束是回车符,因此遇到普通的字母就直接使buf加一,遇到空白符就重新进行字符计算,最后遇到回车符就进行新的读参数的初始化,然后把这些已读的参数传入exec()进行执行。 值得注意的是,需要在父进程中等待子进程进行完成后再执行新参数的读取,因此需要在父进程中写一个wait函数等待子进程执行完成。
三、使用环境
ubantu虚拟机环境下的xv6系统。
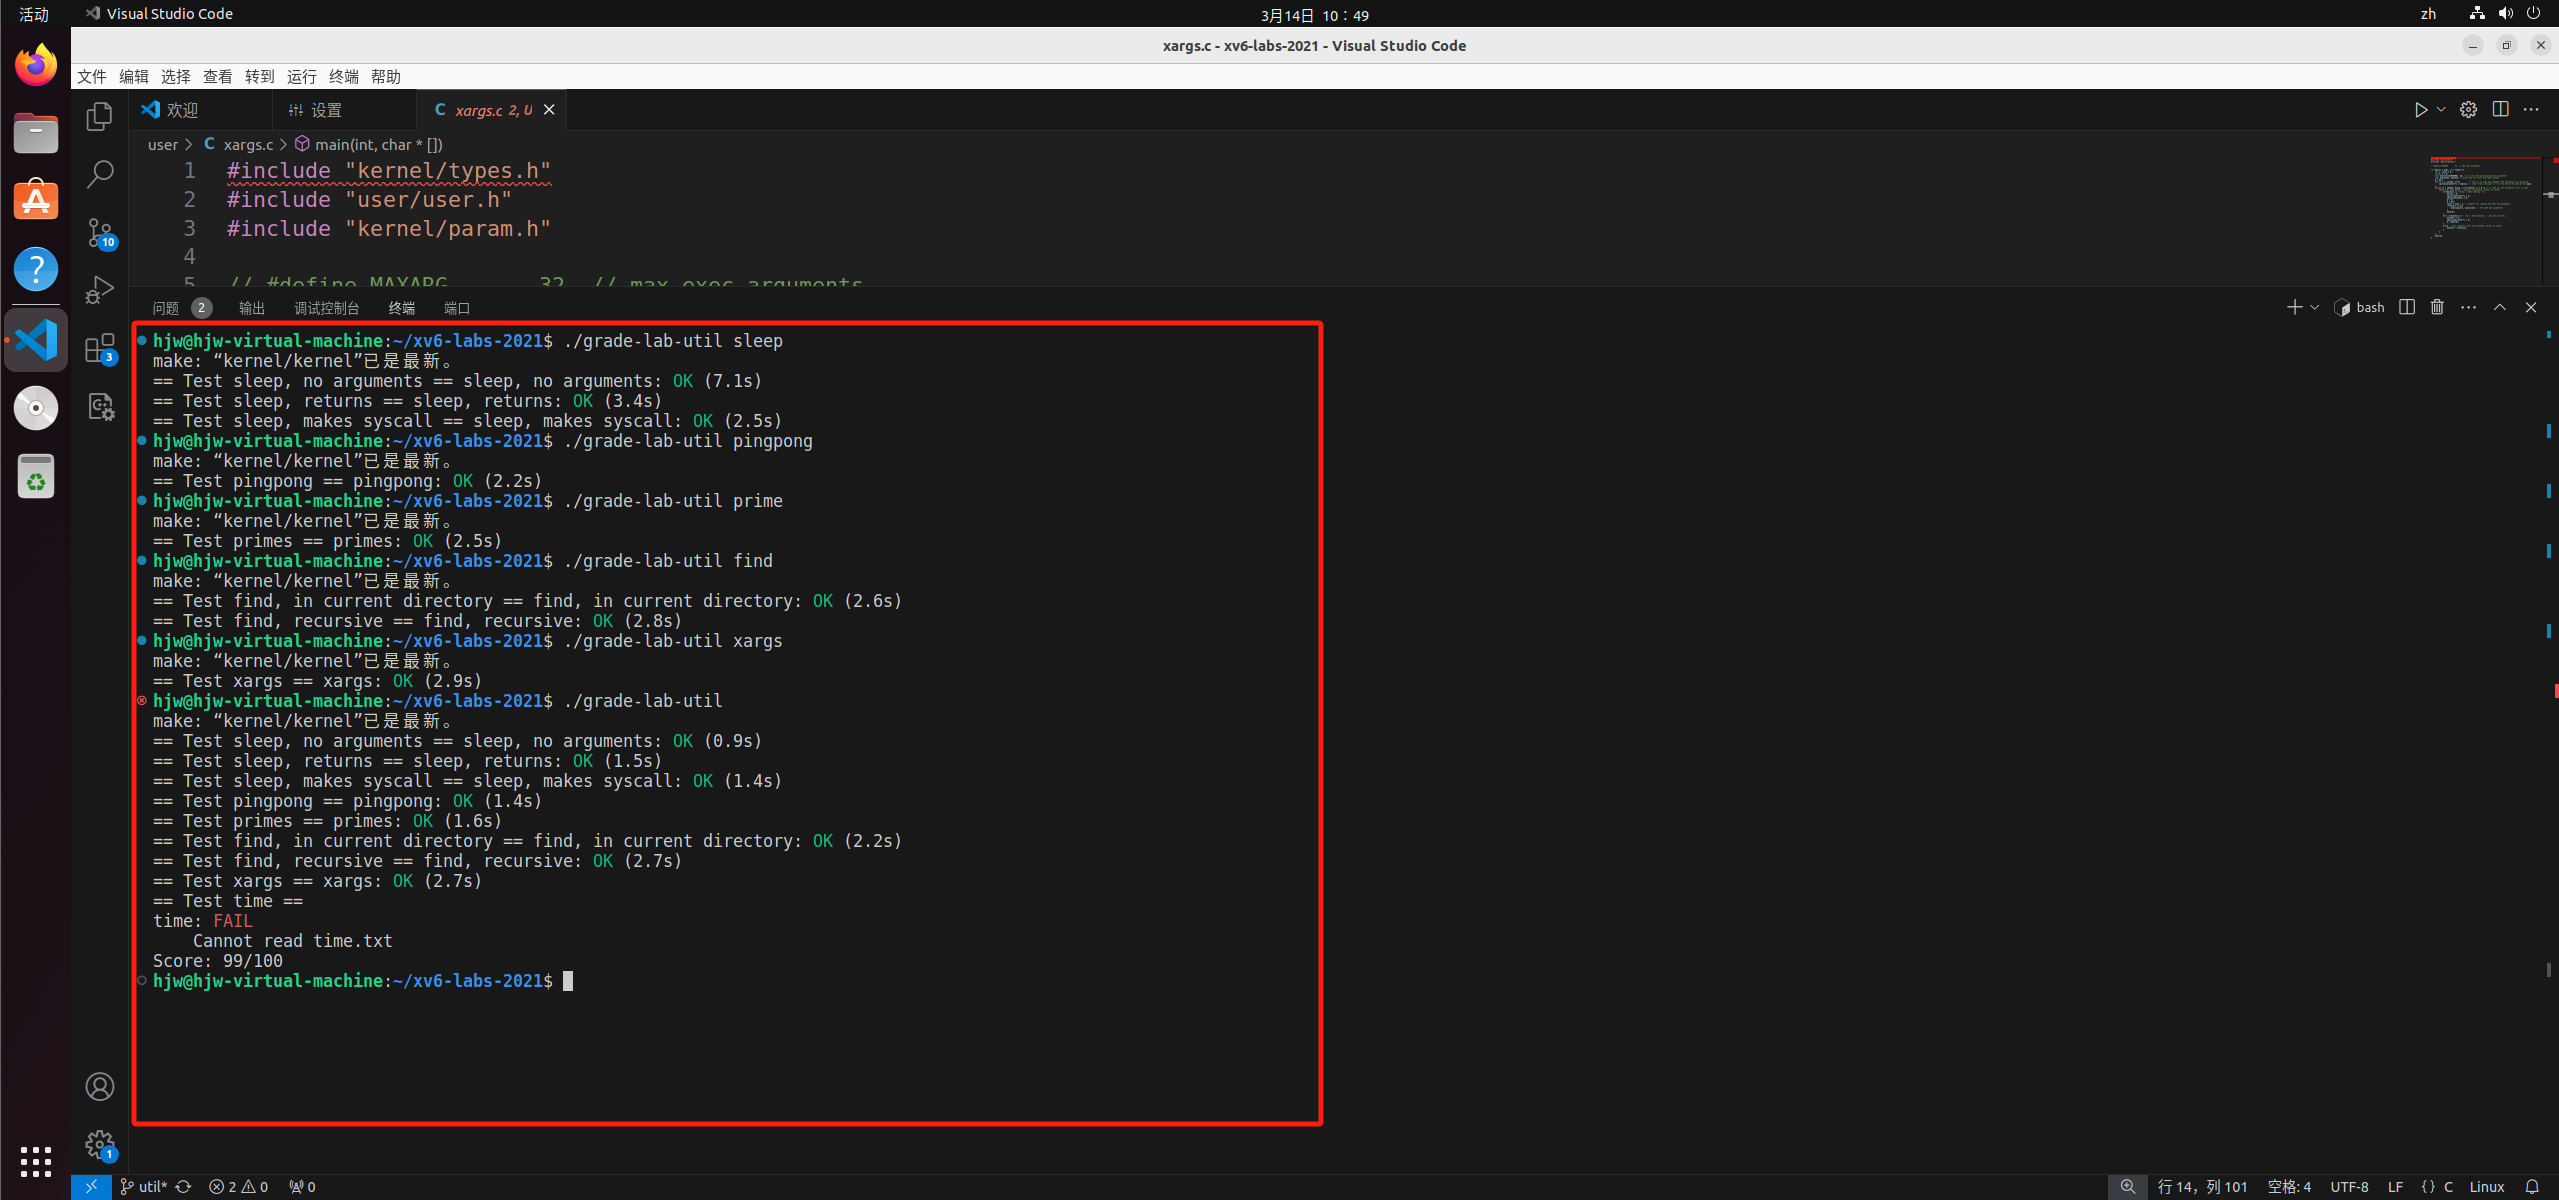
四、实验过程及结果
实验过程见二。实验结果如下:
五、总结
本次实验收获颇丰。
首先,我熟悉了基本的操作系统的概念,以及部分和操作系统相关的函数功能。例如,我学习了pipe的使用方法及其性质,具体地讲,pipe中的内容暂时存储在内核缓存中,不能直接读一个空管道等;再比如,我学习了read和write的使用方式,以及文件描述符的相关定义等。
其次,我了解了命令行和程序的输入输出关系。例如,我们想要在程序中调用命令行参数,则需要使用main函数中的argv,想要获得命令行参数的数目,则需要使用main函数中的argc。
最后,我理解了父子进程的关系,并且灵活运用这个关系,来实现各种操作。例如,通过fork函数创建父子进程,并区别父子进程;通过pipe在父子进程之间传递信息,通过wait函数控制父子进程的执行顺序等。同时,通过read和write函数,获得pipe中的数据,从而实现进程内部功能的区分,并在某些进程中exec其他操作等
总而言之,这次实验使我熟悉了很多之前不曾使用过的函数,同时理解了操作系统的部分运行原理。非常感谢学校给予我这次学习的机会。